The Main menu
The Main menu displays on the left of the Axiell Collections window at all times:
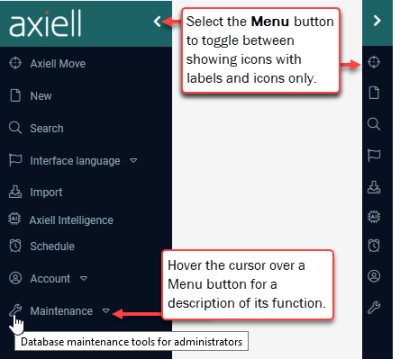
Note: Depending on your version of Collections and assigned role, the Main menu may include different options from those shown in the image above.
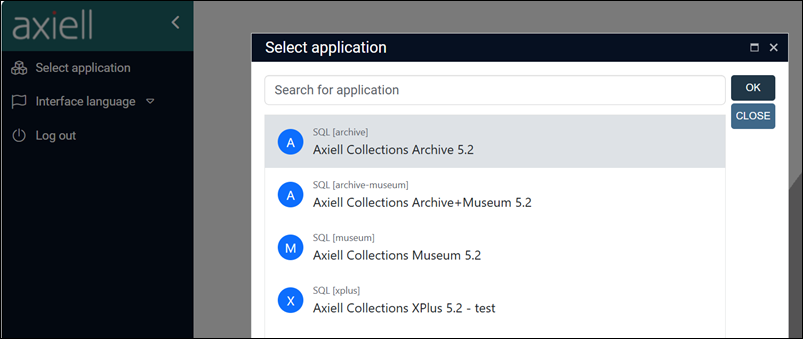
This option is available in multi-tenancy environments1 (common in large organizations that host multiple institutions, each running its own instance of Collections). When a user logs in to Collections the Select application dialogue automatically opens, listing available applications, from which one is selected:
At any time, the Select application option in the Main menu can be selected to switch between applications; it is not necessary to log out and back in again in order to switch between applications, as was the case in earlier versions of Collections.
In fact, it is possible to work in different applications simultaneously within a single user login session by opening Collections in another browser tab and then selecting another application from the Select application dialogue.
Tip: It is important that the URLs for each open tab do not have the same ?tabid=<id_string> (e.g. ?tabId=367185-921); typically, they will only have the same tabid if you copy and paste the URL from an open session (or your Collections bookmark includes a tabid). If so be sure to remove the ?tabid=<id_string> from the URL in the second tab.
Details
Select the required application in the Select application dialogue and click OK or double-click the application name to open it.
Tip: The list of applications can be filtered by keying the name of an application in the search field at the top of the Select applicationdialogue.
The Select application dialogue lists each application by its title, e.g. Axiell Collections Archive 5.2 and, in square brackets, the name of the folder in the file system that holds the application definition, e.g. [archive]; authorised users will also see the session manager id (e.g. SQL). Each application is listed with an icon, which by default is a blue circle with the first letter of the folder name, but Application Administrators can customize these icons for each application:

Select New to create a new record. The Select data source box will display with a list of the data sources![]() The management of a collection can involve a vast amount of information about objects / items / books, people and organizations, events, administration and more. This information is stored as records in data sources. Each data source stores a specific type of information: details about collection items, people, events, loans, and so on. you are authorized to work with. Choose the data source that your new record will be added to.
The management of a collection can involve a vast amount of information about objects / items / books, people and organizations, events, administration and more. This information is stored as records in data sources. Each data source stores a specific type of information: details about collection items, people, events, loans, and so on. you are authorized to work with. Choose the data source that your new record will be added to.
Everything you need to know about creating records can be found here.
Select Search (or use the F8 keyboard shortcut) to commence a new search.
The Select data source box will display with a list of the data sources![]() The management of a collection can involve a vast amount of information about objects / items / books, people and organizations, events, administration and more. This information is stored as records in data sources. Each data source stores a specific type of information: details about collection items, people, events, loans, and so on. you are authorized to work with. Choose which data source you want to search.
The management of a collection can involve a vast amount of information about objects / items / books, people and organizations, events, administration and more. This information is stored as records in data sources. Each data source stores a specific type of information: details about collection items, people, events, loans, and so on. you are authorized to work with. Choose which data source you want to search.
Everything you need to know about searching can be found here.
The language used for labels in the Axiell Collections User Interface is changed independently of the language in which your data is recorded:
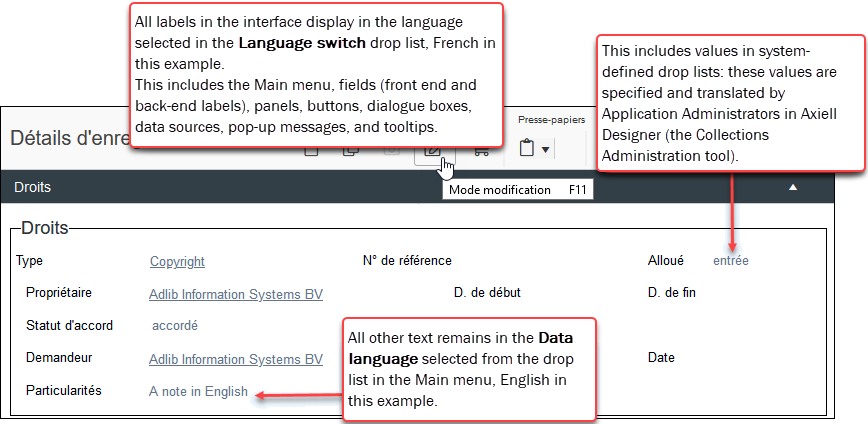
- The interface language is the language used for all labels throughout the Collections interface, including fields, panels, buttons, dialogue boxes, data sources, pop-up messages, tooltips, and enumerative fields (explained below), all of which are specified and translated in Axiell Designer
 A tool for designing, creating, customizing and managing Axiell Collections applications and databases, broadly speaking, the Axiell Collections Model Application. As well as managing databases, including user access and permissions, Designer is used for such tasks as translating field labels, tooltips, values in drop lists, etc..
 - The data language is the language in which you enter details in all fields (with the exception of enumerative fields).
In a multilingual system it is possible to view and edit data in each available language by selecting a language from the Data language menu option.
Select a language from the Interface language menu option to switch the language used for all labels in the Collections interface.
This option is used to switch the language used for all text in the Collections interface that is specified and translated in Axiell Designer![]() A tool for designing, creating, customizing and managing Axiell Collections applications and databases, broadly speaking, the Axiell Collections Model Application. As well as managing databases, including user access and permissions, Designer is used for such tasks as translating field labels, tooltips, values in drop lists, etc., the Axiell Collections administration tool. This includes labels for all menus, fields and panels (in Record details View), buttons, dialogue boxes, data sources, pop-up messages:
A tool for designing, creating, customizing and managing Axiell Collections applications and databases, broadly speaking, the Axiell Collections Model Application. As well as managing databases, including user access and permissions, Designer is used for such tasks as translating field labels, tooltips, values in drop lists, etc., the Axiell Collections administration tool. This includes labels for all menus, fields and panels (in Record details View), buttons, dialogue boxes, data sources, pop-up messages:
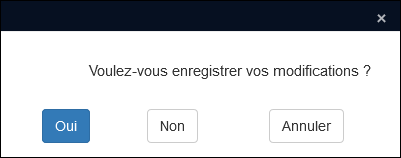
as well as tooltips:

A field's system name can be translated in Axiell Designer and the translation will be shown in a tooltip in the current interface language (French in this example):
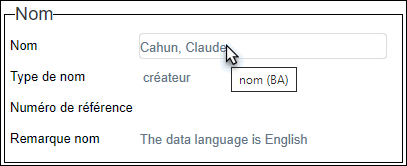
In the image above you will observe that although labels are French, the tooltip is French AND a value in the Name Type field (Type de nom) is also French, the data language is in fact still English.
The reason why the value in Type de nom is translated is that enumerative fields are read-only drop lists and their values are added and translated in Axiell Designer![]() A tool for designing, creating, customizing and managing Axiell Collections applications and databases, broadly speaking, the Axiell Collections Model Application. As well as managing databases, including user access and permissions, Designer is used for such tasks as translating field labels, tooltips, values in drop lists, etc.: as a user you can select a value in an enumerative field, but you cannot add or translate a value.
A tool for designing, creating, customizing and managing Axiell Collections applications and databases, broadly speaking, the Axiell Collections Model Application. As well as managing databases, including user access and permissions, Designer is used for such tasks as translating field labels, tooltips, values in drop lists, etc.: as a user you can select a value in an enumerative field, but you cannot add or translate a value.
In a multilingual system the language in which your record data is displayed and edited is switched with the Data language option in the Main menu. In this example the interface language is French and the data language is English:
In a multilingual system it is possible to view and edit data in each available language by selecting a language from the Data language drop list:
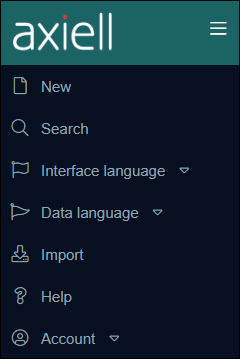
Selecting a language from the drop list will change the language in which data is displayed and edited in all fields - with the exception of enumerative fields (explained above).
To assist with keeping track of which data language is currently active (and minimizing the risk of entering data in the wrong language), the active data language is indicated beside the data source name in the Title bar2:

See Working in multilingual systems for assistance with translating data.
Select Import to import data from a CSV (Comma-Separated Values) file to create new records and/or update existing records.
The Select data source box will display with a list of the data sources![]() The management of a collection can involve a vast amount of information about objects / items / books, people and organizations, events, administration and more. This information is stored as records in data sources. Each data source stores a specific type of information: details about collection items, people, events, loans, and so on. you are authorized to work with. Choose which data source to update with data imported from the CSV file.
The management of a collection can involve a vast amount of information about objects / items / books, people and organizations, events, administration and more. This information is stored as records in data sources. Each data source stores a specific type of information: details about collection items, people, events, loans, and so on. you are authorized to work with. Choose which data source to update with data imported from the CSV file.
Everything you need to know about importing records can be found here.
Axiell Intelligence is an optional feature designed to enrich your Collections data by leveraging AI to identify entities (people, places, dates, and so on) in your unstructured content and write-back structured keyword metadata linked to authority records and Wikidata.
The core concepts of Axiell Intelligence are Entity Extraction (also known as Named Entity Recognition) and Entity Linking. The first identifies entities within unstructured text in nominated fields, and classifies them into predefined categories such as individuals (people’s names), organizations (names of companies, institutions, or groups), locations, dates, times, and more. Structured metadata in the form of keywords (names, terms, etc.) is then written back to the source records, linked to authority![]() Authority data sources are used for vocabulary control and they manage the many names and terms referenced by records in almost every other data source. The purpose of a controlled vocabulary is to ensure consistent use of names and terms throughout your records and this is achieved by specifying that a name or term is preferred; then when a non-preferred version of a name or term is selected in a Linked field drop list, it is automatically replaced with the preferred name or term. records in Persons and institutions and the Thesaurus (created on-the-fly if necessary) and to Wikidata.
Authority data sources are used for vocabulary control and they manage the many names and terms referenced by records in almost every other data source. The purpose of a controlled vocabulary is to ensure consistent use of names and terms throughout your records and this is achieved by specifying that a name or term is preferred; then when a non-preferred version of a name or term is selected in a Linked field drop list, it is automatically replaced with the preferred name or term. records in Persons and institutions and the Thesaurus (created on-the-fly if necessary) and to Wikidata.
Axiell Intelligence's AI is able to process data faster and more efficiently than we can, while enabling human oversight to ensure an ideal combination of machine and human intelligence. The end result is enriched data with interlinked records, providing improved context for staff, researchers, and the public.
You will find full details about Axiell Intelligence here.
With the Schedule feature3 it is possible to run various tasks and processes, such as Import jobs and Saved searches4, in the background and at specific times.
Note: This feature is separately licensed and requires Axiell ALM assistance to set up. Please contact your Account Manager or Axiell ALM for more information.
When implemented in your system, a Schedule option is added to the Main menu:
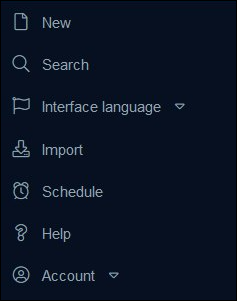
Select Schedule to view details of scheduled tasks:
An entry is added to the Scheduled tasks box for any scheduled background task, including import jobs and scheduled searches. Options include:
|
Option |
Details |
|---|---|
|
Details |
Select an entry to view details about the task. |
|
Delete5 |
As the list of tasks is not cleaned up automatically, it will grow when tasks are run in the background regularly. Rows holding task details that are no longer required can be deleted (to select more than one row use CTRL+click for non-consecutive entries and SHIFT+click for consecutive entries). Notes:
|
More details:
- See New SDI implementation for details of the enhanced service introduced with Collections version 1.12.
- See The Import tool: how to import data for details about scheduling import jobs.
- See Saved searches for details about scheduling saved searches.
Select Help to open this Online Help in a separate tab in your device's default web browser.
More details
- See The Axiell Collections Help for details about the online help available in Axiell Collections.
- See Field help: Help View, Field properties and Tooltip for details about other forms of help available when working with Axiell Collections.
Select Account to view and modify various account settings, and to log out of Axiell Collections.
Your system may not include all options described here:
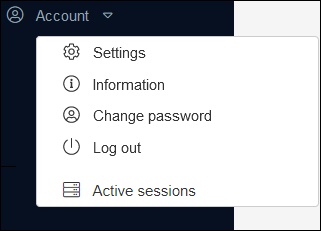
When you are finished working with Collections it is good practice to log out: do not simply close the browser tab in which you were working or close the browser itself.
Not only is it more secure to log out rather than simply to close the browser or tab, your licence is immediately freed-up and available to other users in your organization.
The options available when selecting Account>Settings depend on your version of Collections (details below if your version of Collections is older than 1.16).
The Settings box displays:

Two options are available:
By default, Collections recalls the choices you make on the Standard search tab so that when you next access the tab, the search terms you last specified are shown (including search values entered, and selection of search operators, the OR Boolean Operator and Expand option).
To change this behaviour disable the Remember Standard Search values and operators option6 so that the Standard search tab is in its default state every time it is accessed (that is, with no search values entered, the default search operators selected, the AND Boolean operator selected, and the Expand option deselected).
Reset all settings to their default
Users are able to customize many areas of Collections
If your version of Collections is older than 1.16, this is the only option available when selecting Account>Settings:
- Select Account>Settings from the Main menu.
The Settings box will display asking you to confirm the reset.
- Select OK to proceed.
ALL settings that you have changed are returned to their default setting.
It is possible to return ALL settings that you have changed to their default:
- Select Account>Settings>Clear All from the Main menu.
A message will display asking you to confirm the reset.

- Select Yes to proceed.
Note that it is not necessary to perform a global reset if you only wish to return a particular Display View's settings to their default.
To return a View's settings to their defaults:
- Select
 in the View's toolbar.
 - Select Reset.
This will restore the default settings of the View without affecting every other setting across Collections.
The Information box7 holds details about the currently logged in user, as well as the version, build number and build date of the current implementation of Collections8:
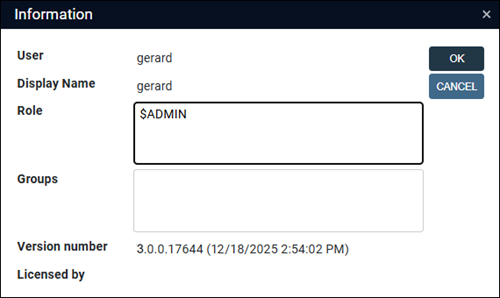
In this example, the version is 3.0 and the build is 0.17644.
Tip: If your version of Collections is older than 3.0, this information is found in the Status bar of the Collections browser window.
User details include:
- The username of the currently logged in user.
- The role that user has been assigned in Axiell Collections.
- The name of any Active Directory groups that user belongs to.
These details can be used by Application Administrators to identify a user's access permissions (to investigate why a user does / does not have access to some aspect of Axiell Collections).
Axiell Collections features a comprehensive and granular access rights system based on roles. Access to every aspect of Collections (data sources![]() The management of a collection can involve a vast amount of information about objects / items / books, people and organizations, events, administration and more. This information is stored as records in data sources. Each data source stores a specific type of information: details about collection items, people, events, loans, and so on., fields, functionality and more) is determined by the permissions assigned to a role. Roles can be linked to almost any part of Collections, both to database components (up to individual fields and records) and to functions such as record entry, deletion of records, location management and reporting. Access rights can be applied at the individual record level to make records accessible or not accessible for specific groups of users.
The management of a collection can involve a vast amount of information about objects / items / books, people and organizations, events, administration and more. This information is stored as records in data sources. Each data source stores a specific type of information: details about collection items, people, events, loans, and so on., fields, functionality and more) is determined by the permissions assigned to a role. Roles can be linked to almost any part of Collections, both to database components (up to individual fields and records) and to functions such as record entry, deletion of records, location management and reporting. Access rights can be applied at the individual record level to make records accessible or not accessible for specific groups of users.
If your organization uses Active Directory for user authentication, Active Directory groups can be assigned to roles in the Collections access rights system.
See Access rights and the permissions model for an overview of the Collections permissions model.
It is also possible to configure Collections to include a Forgot your password? link on the login screen. Details here.
You can change the password you use to log in to Collections if the Account entry in the Main menu includes the Change password option. This option is not available by default and is only possible if is used by your organization to manage permissions and access to Axiell Collections.
Note: This option will also change your Windows password.
- Select Account>Change password from the Main menu.
The Change password box will display:
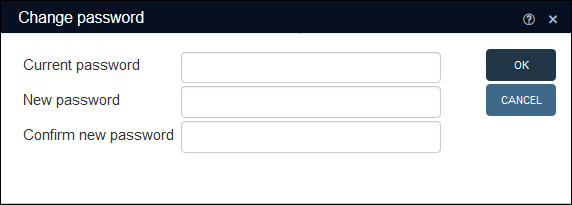
- Complete all fields and select OK.
A message will indicate the success or failure of the password change.
Configuration details for this option are available here.
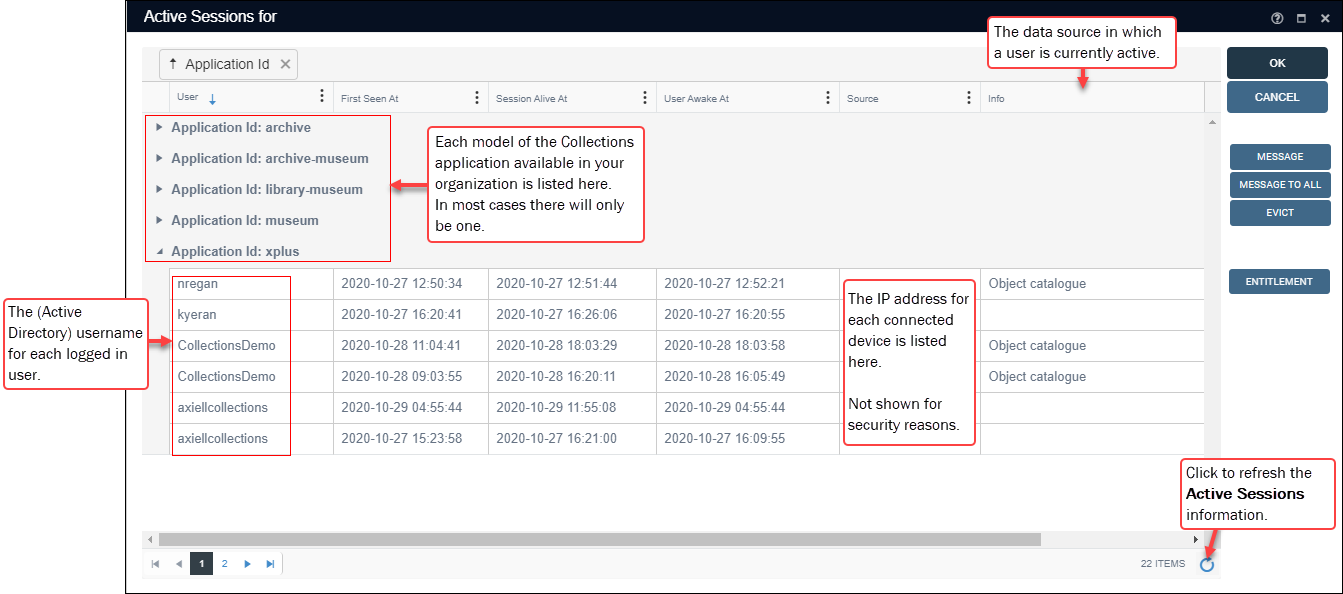
The Active Sessions option allows Administrators (any user who has been assigned the $ADMIN role) to monitor who is logged in to Collections, to send a message to a logged in user, close sessions (Evict a user) and view licence details.
Note: If this option is available in your system, it will only display for Administrators.
Select Account>Active Sessions from the Main menu to display the Active Sessions box:
Details are available in six columns (which can be filtered and sorted):
| Column | Details |
|---|---|
|
User |
The username (as registered in Active Directory) for each user currently logged in to every available application (in most cases there will only be one application, XPlus or Museum for instance). |
|
First seen at |
The date and time that the user logged in to Collections. |
|
Session alive at |
The date and time that the user's session was last alive (when the session was last considered active). |
|
User awake at |
The date and time of the last action performed by the user. |
|
Source |
The IP address of the user's connected device. |
|
Info |
Depending on your system's configuration and version of Collections, the following options may be available:
| Option | Details |
|---|---|
|
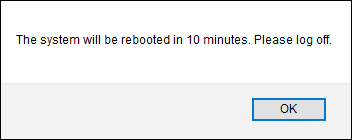
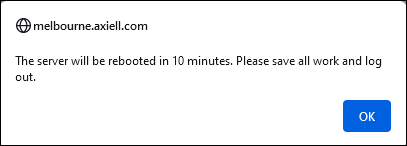
Send a message to a logged in user. Select a user and click Message to display the Send message box. Enter a message: and click OK. The message will display in a pop-up for the user:
The user will need to click OK to acknowledge the message and remove the pop-up. Note: It is not possible to send a message to multiple users simultaneously. |
|
|
Message to all9 |
Send a message to all logged in users (excluding the sender), for instance warning that the server is about to be rebooted.
|
|
Select a user and click Evict to end the user's session and log them out of the system. |
|
|
Select Entitlement to view licence details, which can include the licence holder name, licence count and expiry date (depending on your system's configuration): Tip: Collections counts licences in use per browser: if a user has a session open in two browsers, this uses two licences. |
The Maintenance menu option is only available to administrators (users who have been assigned the $ADMIN role).
The option to restore deleted records is only available to users who have been assigned the $ADMIN role in systems in which journalling has been enabled.
Details about setting up journalling are available in the Axiell Designer![]() A tool for designing, creating, customizing and managing Axiell Collections applications and databases, broadly speaking, the Axiell Collections Model Application. As well as managing databases, including user access and permissions, Designer is used for such tasks as translating field labels, tooltips, values in drop lists, etc. help (here). In brief, set Journal field changes= Record history (Collections) on the Advanced tab when editing properties for each data source that requires journalling:
A tool for designing, creating, customizing and managing Axiell Collections applications and databases, broadly speaking, the Axiell Collections Model Application. As well as managing databases, including user access and permissions, Designer is used for such tasks as translating field labels, tooltips, values in drop lists, etc. help (here). In brief, set Journal field changes= Record history (Collections) on the Advanced tab when editing properties for each data source that requires journalling:
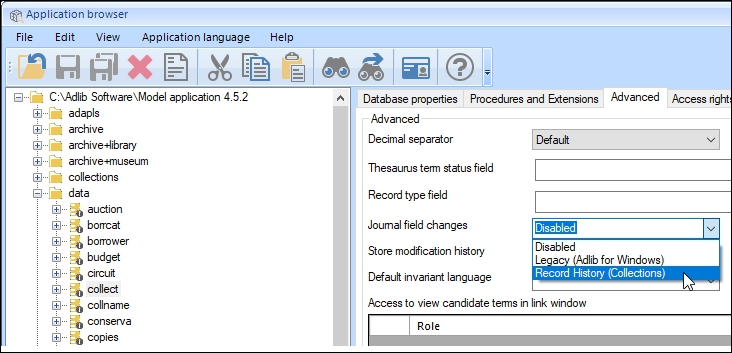
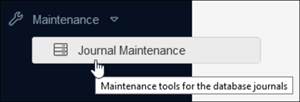
The Journal Maintenance option, which is available in systems where record auditing (journalling) is active (details above), enables authorized users to restore deleted records10:
To restore deleted records:
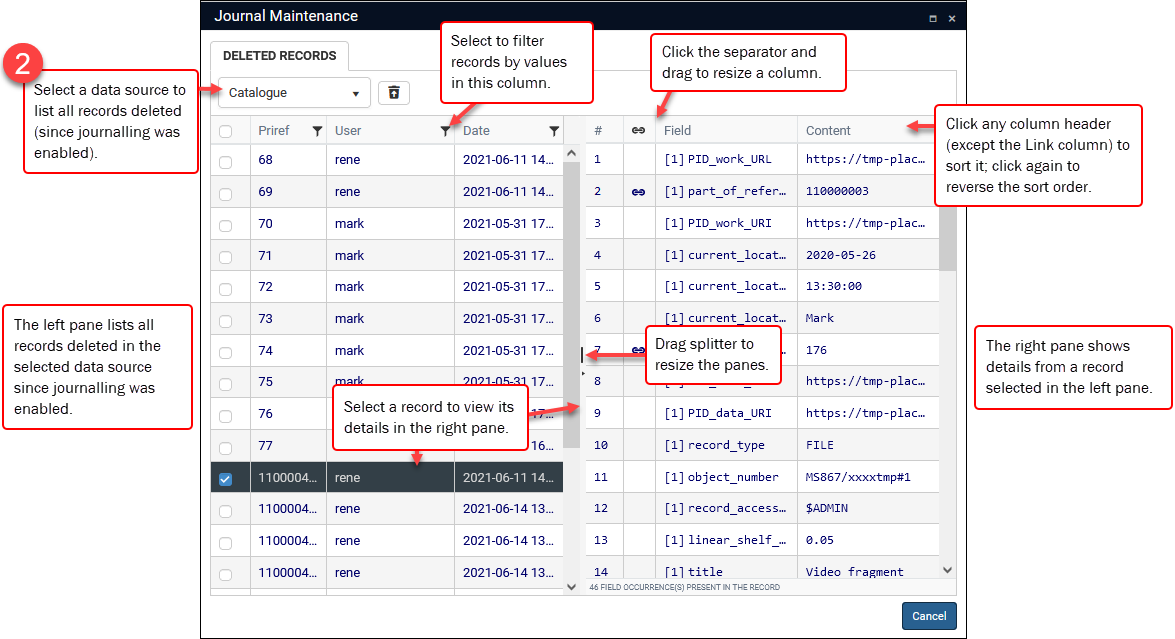
- Select Maintenance>Journal Maintenance to open the Journal Maintenance box:
- Select a data source
 The management of a collection can involve a vast amount of information about objects / items / books, people and organizations, events, administration and more. This information is stored as records in data sources. Each data source stores a specific type of information: details about collection items, people, events, loans, and so on. from the drop list.
All records deleted (since journalling was enabled in the data source) are listed in the left pane. Details include:
- the record's unique identifier (priref
 A record's unique identifier (aka Record number). The Record number field is found on the Management details (or Notes and description) panel in Collections version 5.0 onwards. Alternatively, add the priref column to Result set View. The field tag for the priref field is %0.);
 - the name of the user who created the record; and
- the original creation date.
Tip: Each column includes a filter
 option, allowing records to be filtered based on values in one or more columns.
 - the record's unique identifier (priref
- Select a record in the left pane to view its details in the right pane11.
Notes:
- Each row in the right pane displays details of a single field occurrence
 If a field in the current record can have more than one value, we add an occurrence of the field for each value (e.g. a book can have multiple authors so we add an occurrence of the author.name (au) field for each author). An occurrence can be a member of a group of fields, and adding an occurrence of the field adds all members of the group at once. (the number in
 [ ]indicates which field occurrence it is). - A Linked field
 A type of field used to link one record to another. A Linked field is a drop list of values (records that the field can link to). When a link is made, the field stores a reference to the linked record (a linkref). is indicated with a chain icon in the second column; the content of Linked fields is not resolved and only the record number of the linked record is shown.
 - The pane can be resized by dragging the splitter; and columns can be resized by dragging the separator between two column headers.
- Any column (both left and right pane) except for the link column (with the chain icon) can be sorted by clicking the column header; click again to reverse the sort order.
- Each row in the right pane displays details of a single field occurrence
- When you have identified which record(s) to restore, click the checkbox to select the record(s) (you can useCTRL+click to select non-consecutive records and SHIFT+click to select a range of consecutive records).
Tip: If you select records using CTRL or SHIFT, release the keyboard button and then click another record, only the last clicked record will be selected (any ticked checkboxes will remain selected however).
- Click the Restore
 button.
A progress bar will display the progress of the record restoration; records are restored with their original priref
 A record's unique identifier (aka Record number). The Record number field is found on the Management details (or Notes and description) panel in Collections version 5.0 onwards. Alternatively, add the priref column to Result set View. The field tag for the priref field is %0.. Once complete the list of deleted records in the left pane will update (removing the restored records).
Notes
- When new or existing records are saved to the database a before-storage procedure (adapl) is typically executed to check data and to add management details; this procedure does not run when deleted records are restored in order that they are restored exactly as they were when deleted (i.e. with the same management details).
- In rare circumstances, the priref
 A record's unique identifier (aka Record number). The Record number field is found on the Management details (or Notes and description) panel in Collections version 5.0 onwards. Alternatively, add the priref column to Result set View. The field tag for the priref field is %0. for a deleted record may have been assigned to a new record; in this case, the deleted record will not be listed in the Journal Maintenance box and it cannot be restored using this method.
Details about setting up and fine-tuning the Record History Reports utility can be found in the Axiell Designer Help.
The Record History Reports utility is available for purchase (please contact Axiell Sales for details about cost)12.
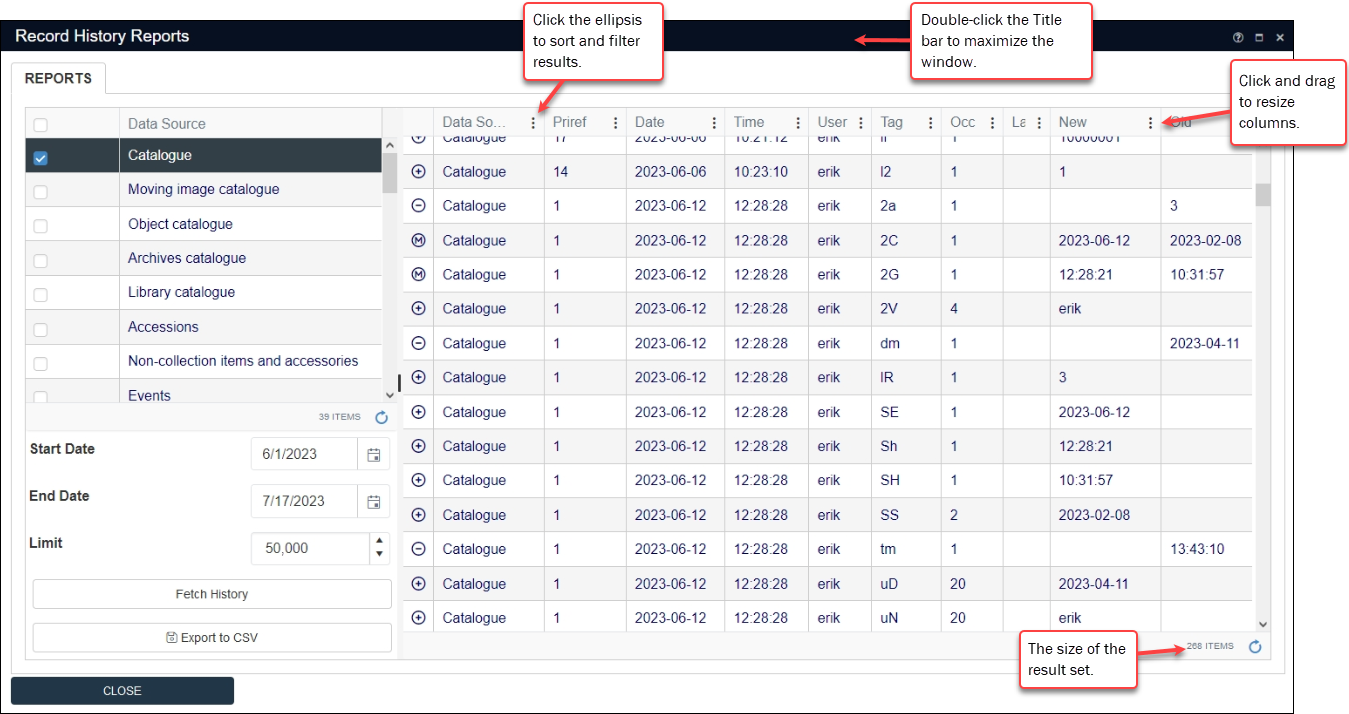
Users with the $ADMIN role can use this utility to list records changed within a specific period, with the old and new values displayed per field:
- Select Maintenance>Record History Reports to display the Record History Reports dialogue.
- Select the checkbox for one or more data sources
 The management of a collection can involve a vast amount of information about objects / items / books, people and organizations, events, administration and more. This information is stored as records in data sources. Each data source stores a specific type of information: details about collection items, people, events, loans, and so on..
 - Specify a date range in the Start Date and End Date fields.
- Click Fetch History:
 Enhancements to the Record History Reports utility
Each new release of Collections typically includes enhancements to the Record History Reports utility and this documentation is updated to reflect those changes when they impact use of the utility. There are many other changes from one version to another that improve the experience of working with the utility (improvements to the user interface, for example) and you will find links to their description below:
Details:
Option Details Limit per data source13
The Limit per data source specifies the maximum number of journal records to retrieve per data source.
Note: A single journal record may contain multiple changes, and the result set shows all changes from the journal records, a single change per row. As such, the number of rows in the result set may be much larger than the number specified in Limit per data source.
While this value can be changed, it is not recommended that the number is set too high. The right bottom corner of the window indicates the current size of the result set.
Tip: A large amount of logging data is created when data is imported into Collections. Following a large import, be careful to limit your search to a single data source and/or only a single day for example, otherwise the query might take too long and time out.
Note: Once the search commences, a Cancel button is available to stop the search manually.
By clicking the vertical ellipsis in a column header and selecting an option, results can be sorted and/or filtered by values in a column.
Note: From Collections version 2.0 onwards it is not possible to sort on the New data and Old data columns. If it is necessary to sort on the data columns, it is possible to export the list to CSV and use Excel for sorting. Details here.
Results can be exported to
.csvfile for further processing by clicking the Export to CSV button. A.csvdocument (which includes column labels and data) with a name formatted as:record_history_report_<date-time>.csv
will be saved to your Windows Downloads folder.
Tip: All column labels and data are exported with the Export to CSV option.
The Record History Reports window can be maximized by double-clicking the Title bar or by dragging one of the borders. Columns can be resized by dragging any of the column header separators (this works best when the window has been maximized).
Tip: Currently, size changes are not remembered.
The first column, Type, contains one of three icons:
| Icon | Label | Details |
|---|---|---|
|
|
Plus | Indicates that a value was added to an empty field. The New column holds the value; the Old column is empty. |
|
|
Minus |
Indicates that the value in the field was deleted. The Old column holds the deleted value; the New column is empty. |
|
|
M (Modified) | Indicates that the value was modified. The New column holds the current value; the Old column holds the previous value. |
Tip: Place the mouse cursor over the Type column header for a pop-up tooltip explaining the symbols14.
While there is no function within the Record History Reports dialogue to undo changes to fields, it is of course possible to select and copy a value, locate the relevant record and, in Edit mode![]() A record is either in Display mode (we view its details) or Edit mode (we add or edit its details). A record enters Edit mode as soon as we create a new record, copy a record in Record details View or edit an existing record., paste the value into the appropriate field.
A record is either in Display mode (we view its details) or Edit mode (we add or edit its details). A record enters Edit mode as soon as we create a new record, copy a record in Record details View or edit an existing record., paste the value into the appropriate field.
Note that restoring a value in a Linked field![]() A type of field used to link one record to another. A Linked field is a drop list of values (records that the field can link to). When a link is made, the field stores a reference to the linked record (a linkref). is a little more involved. Full details about how to restore values, including values in Linked fields, can be found here.
A type of field used to link one record to another. A Linked field is a drop list of values (records that the field can link to). When a link is made, the field stores a reference to the linked record (a linkref). is a little more involved. Full details about how to restore values, including values in Linked fields, can be found here.
